Paper candles, a scripture Chain and a paper bag snowflake are easy ways to welcome in the season of Advent (Even at the last minute!)
In this post I’ll tell you the how-t0, the everyday materials we used and list all of the passages of Luke we used for the chain, for your convenience!
*I’m also sharing some videos and pics on my Instagram: @prayersoverthekitchensink and TikTok: @prayeroverthekitchensink
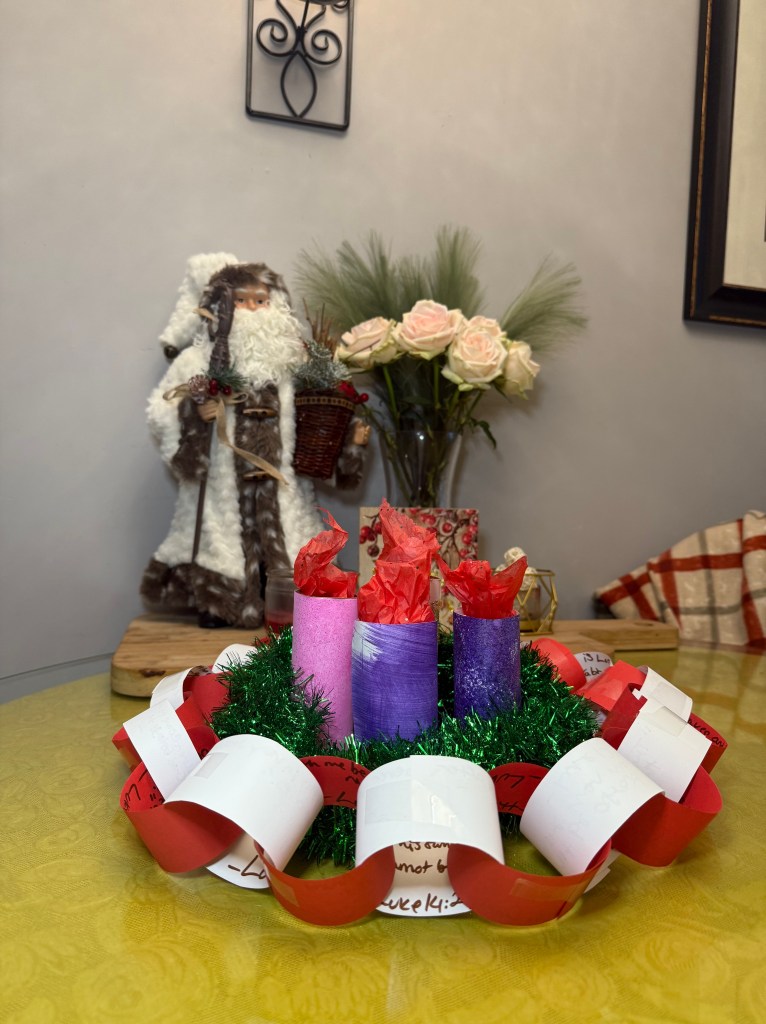
These crafts were so fun and easy to make with the kids. The first craft I’ll highlight is the paper Advent candles. Advent is a time of penance, reflection and preparing our souls to celebrate Jesus’ birth at Christmastide. While the rest of the world is well into cookie parties and full decor, Catholics should slow down to embrace this beautiful time of anticipation. It always makes me think of the last four weeks of pregnancy and what Mother Mary may have felt as she awaited the birth of the Newborn King!
This theme of joyful waiting is articulated by the penitential purple of 3 of the candles as well as the pink of Gaudete Sunday. The weeks, colors and themes are as follows:
Week 1: Purple representing, Hope
Week 2: Purple, Peace
Week 3: Pink, representing Joy (Gaudete Sunday)
Week 4: Purple, representing Love
Christmas: White, representing Christ
I’ve done this project with my kids in the past and it’s great because crayon scribbles, fingerpaint and haphazard glitter all look cool when they’re wrapped around the tube. In years past, I wrote the theme of the week on the side of each candle with black permanent marker and it’s a fun way for children to become familiar with the tradition.
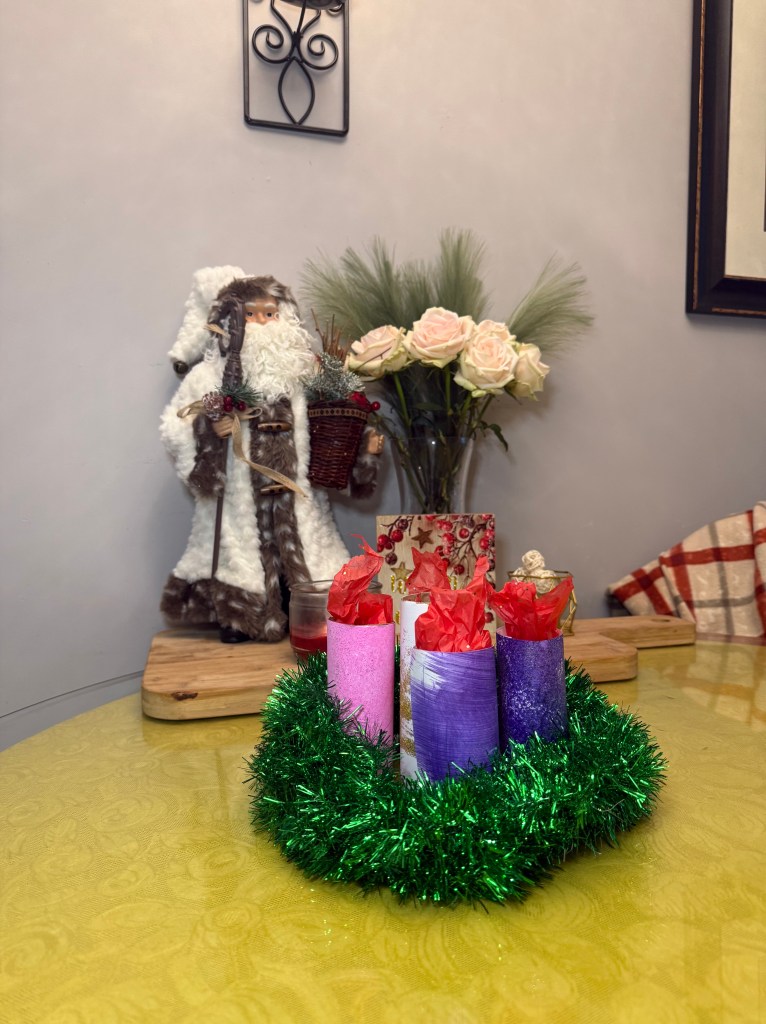
I had all of the materials on-hand aside from the green garland we used as a wreath which I bought at Family Dollar for under $2! I save the cardboard from rolls for our hamster Henry the Friendly to play with so I had a few to work with!
Materials: 4 toilet paper rolls, 1 paper towel roll, tissue paper, pink and purple paint (marker, crayon ect..), optional glitter, tape or glue, scissors
Step 1: You could have the kids decorate the rolls directly but in my case the rolls were brown and it keeps the kids from squishing them out of shape if they color paper instead. This time we decided to try sponge painting and used glitter to make it extra fun.
Step 2: After the paper dried I cut them to size for the rolls, wrapped the paper around and fastened (glue or tape, I used a bit of both!) I find keeping the center, Christmas candle a bit taller gives the wreath some balance and becomes a focal point, that candle is our end game!
Step 3: Next I had the kids rip up some tissue paper, a bit for each candle. I took the middle of the paper and pinched it before pulling it down between my fingers. This makes sure that the “ripped” part comes out of the top of the candle to look like a flame. This makes the tissue paper easy to pull up for the kids but have enough volume to keep its place in the tube.
Step 4: Lastly, I wrapped the garland around my forearm to make a “wreath” and twisted it (you can also braid it if you’re feeling ambitious!) before arranging the candles in a circle by week and putting the white candle in the middle.
To use: Each Sunday evening is when I like to have the kids take their turns “lighting” the candles. I like doing it then because the lessons of Mass are fresh in their mind and it’s a great way to make the Church-home connection if your parish lights a wreath as well!
This craft is not only a great memory of when my middle two were younger, it’s safe for even our baby to take part in. It may even distract them from wanting to play with Mama’s wreath with the real candles if we’re lucky! ha!
The next craft is a Scripture Chain! You may be familiar with the tradition of reading a chapter of the Gospel of Saint Luke each day of December leading up to Christmas Day. There are 24 chapters for the 24 days from the beginning of the month to Christmas Eve. This craft is great because it familiarizes the kids with the Christmas story in Biblical context. As I gathered verses for this project I encountered so many words and phrases from the Mass. Another Church-home connection!
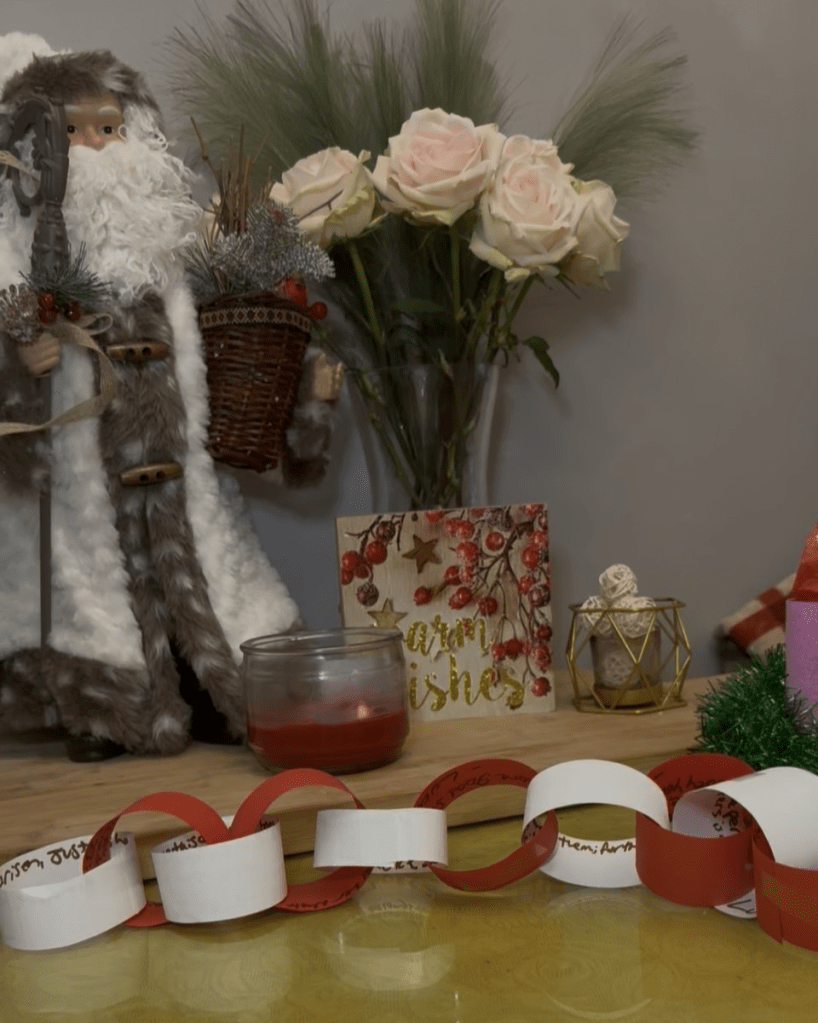
Materials: paper (we used white and red), glue tape or staples, marker
Step 1: To make this even easier and quicker than it already is, I cut 4 pages of paper at a time into 1.5-2in strips before laying them out in the pattern I wanted (red, white, red, white)
Step 2: I read Luke, picking a verse from each chapter to write on the chain with a marker. Older kids can also help with this part! I was careful to keep them in order to make assembly a breeze!
Step 3: Make a circle with the first verse and fasten. Loop the next strip through the first and fasten. Repeat until you have all 24 loops of your chain complete! You can choose to have the words face out or in, we chose to keep them in.
To use: Hang or wrap around your advent wreath. Each day have kids take turns ripping a loop off of the chain and reading the verse of the day. Then you can cuddle up and read the chapter as a family!
Here are the verses we used for each day (I used my kids’ New American Bible Revised Edition for all):
Day 1: Mary said, “Behold, I am the handmaid of the Lord. May it be done to me according to your word.” -Luke 1:38
Day 2: The angel said to them “Do not be afraid; for behold, I proclaim to you good news of great joy that will be for all people.” -Luke 2:10
Day 3: Heaven was opened and the Holy Spirit descended upon Him in bodily form like a dove. -Luke 3:21-22
Day 4: You shall worship the Lord, your God, and Him alone shall you serve.-Luke 4:8
Day 5: Do not be afraid; from now on you will be fishers of men. -Luke 5:10
Day 6: Then he said to them The Son of Man is Lord of the Sabbath. -Luke 6:5
Day 7: Lord, I am not worthy to have you enter under my roof.-Luke 7:6
Day 8: Whoever has ears to hear ought to hear. -Luke 8:8
Day 9: Then taking the five loaves and two fish and looking up to heaven, He said the blessing over them, broke them and gave them to the disciples to set before the crowd. -Luke 9:16
Day 10: The harvest is abundant, but the laborers are few. -Luke 10:2
Day 11: Seek and you will find, knock and the door will be open to you. -Luke 11:9
Day 12: Blessed are those servants whom the master finds vigilant on his arrival. -Luke 12:37
Day 13: Strive to enter through the narrow door. -Luke 13:24
Day 14: Whoever does not carry his own cross and follow me cannot be my disciple. -Luke 14:27
Day 15: Rejoice with me for I have found my lost sheep. -Luke 15:6
Day 16: The person who is trustworthy in very small matters is also trustworthy in great ones. -Luke 16:10
Day 17: If you have faith the size of a mustard seed you would say to this mulberry tree be uprooted and planted int he sea and it would obey you. -Luke 17:5
Day 18: Let the children come to me and do not prevent them; for the kingdom of God belongs to such as these. -Luke 18:16
Day 19: Well done good and faithful servant! -Luke 19:17
Day 20: Then repay to Ceasar what belongs to Ceasar and to God what belongs to God. -Luke 20:25
Day 21: She from her poverty has offered her whole livelihood. -Luke 21:4
Day 22: Take this and share it among yourselves -Luke 22:17
Day 23: Amen, I say to you, today you will be with me in Paradise. -Luke 23:42
Day 24: He is not here, but has been raised. -Luke 24:6
The last quick paper craft is a big snowflake made out of lunch bags! We’ve also done this in the past and it’s low effort for stunning results because of the big proportions opening the bags creates. It’s fun and error proof, almost any shape can be cut into the side and make for results as unique as a real flake!
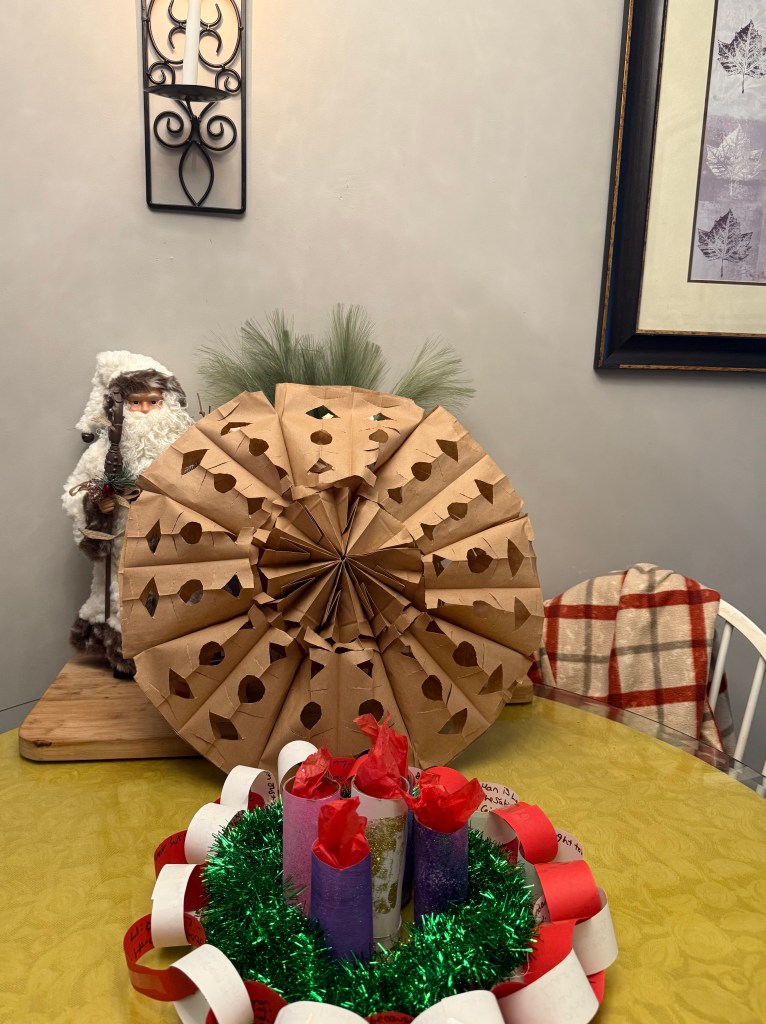
Materials: 8 paper bags (makes one), glue, scissors, yarn, hole punch (optional)
Step 1: Lay paper bag flat with bottom flap up
Step 2: Trace an upside down “T” shape on the bag with glue. Make a vertical line down the length of the bag and a horizontal line across the bottom flap
Step 3: Repeat this step for the remaining bags, pushing firmly as you go. I like to put a heavy book or other item on the bags at this point to allow the adhesive to set and dry
Step 4: This is the fun part! Open the bags on the top and bottom and bring the edges together to meet. As you do, the bags will open and the designs will unfurl. Fasten the edges of the bags in the middle securely.
Step 5: Make a hole in the edges of the two bags and pull yarn, ribbon or string through to hang!
These would look great when working with white paper bags but, I like the rustic look of the brown, myself. You can make as many as you want and it couldn’t be easier!
I hope you liked these last-minute Advent crafts for the whole family. They make great homeschool or Sunday school projects as well and can be tweaked for younger or older children as needed. It’s okay if you don’t start on day one! Read 2 chapters a day or light 2 candles this week. There are no rules really!
As we’re tempted to do the most this Advent let us remember the most important thing instead: To take advantage of this “little Lent” to prepare our hearts and souls to celebrate Jesus this Christmas season.
God bless you and happy Liturgical New Year!
Love, Cait
